Guide · How-to
How to make a dried orange garland (and hang it without nails)
Applies to: US Oven figures are Clemson Cooperative Extension's (South Carolina); safety advice is from US bodies (NFPA, CPSC).
This page is only available in English. The language switch leads to the closest German page.
In short
Dry 1/8-inch (3 mm) orange slices on parchment at 175°F (80°C), never above 200°F (93°C), flipping every 30 minutes for 3 to 5 hours. They are done when no sticky or soft spots remain. Stay in the kitchen while the oven runs, cool the slices on a rack, thread them on twine and hang the garland from a tension rod, shelf ends or over-door hooks instead of nails.
At a glance
| What | Value | Basis |
|---|---|---|
| Dehydrator setting and time | 130°F, 12–14 h54°C; flip the slices every hour for even drying | [1] |
| Timer rounds in the oven | 6–103 h ÷ 30 min = 6; 5 h ÷ 30 min = 10, one flip check per round | calculated · [1] |
| Slices per inch of fruit, at most | 81 in ÷ 1/8 in = 8 slices at the recommended thickness, before trimming the ends | calculated · [1] |
| Storage life of dried slices | several yearsIn an airtight container in a cool, dark place | [1] |
| Distance from lit candles | at least 12 in30 cm from anything that can burn, which includes a dried garland | [4] |
| Adhesive hook capacity (Command) | 0.5–7.5 lb0.2–3.4 kg depending on the hook; one hook per item; wait one hour before hanging | [5] |
| Falls among holiday decorating injuries | 41 %Of about 14,700 ER-treated holiday decorating injuries in the US in one November–December holiday season (CPSC, 2017 release) | [3] |
Contents
- Which oranges work best for a dried garland?
- How thick should you slice oranges for drying?
- How long do orange slices take to dry in the oven?
- Oven or dehydrator: which is better for orange slices?
- How do you know when dried orange slices are done?
- Is it safe to leave the oven on for hours?
- How to string a dried orange garland
- How to hang a garland without nails
- Keeping a dried orange garland away from candles and heat
- How to store a dried orange garland for next year
- Common questions
- Sources and method
A dried orange garland is made in two parts: an afternoon of drying slices in a low oven, then stringing them and finding a place to hang the garland that needs no nails. The drying method follows Clemson Cooperative Extension's instructions for citrus used in holiday decorations [1].
Which oranges work best for a dried garland?
Navel oranges are the Clemson Extension author's favourite for drying, but any citrus works, including lemons, limes or grapefruit [1]. Mixing them gives a garland in orange, yellow and green. What matters more than the fruit is that you can cut it evenly, so pick firm fruit that sits steady on the board.
How thick should you slice oranges for drying?
Orange slices for drying should be a consistent 1/8 inch (3 mm) thick [1]. Even thickness matters more than the exact number: Clemson notes that thinner slices may burn and thicker ones may not dry well [1], so a tray of mixed slices ends up partly scorched and partly soft. A sharp knife and slow, straight cuts help more than speed.
 (Open the diagram full size)
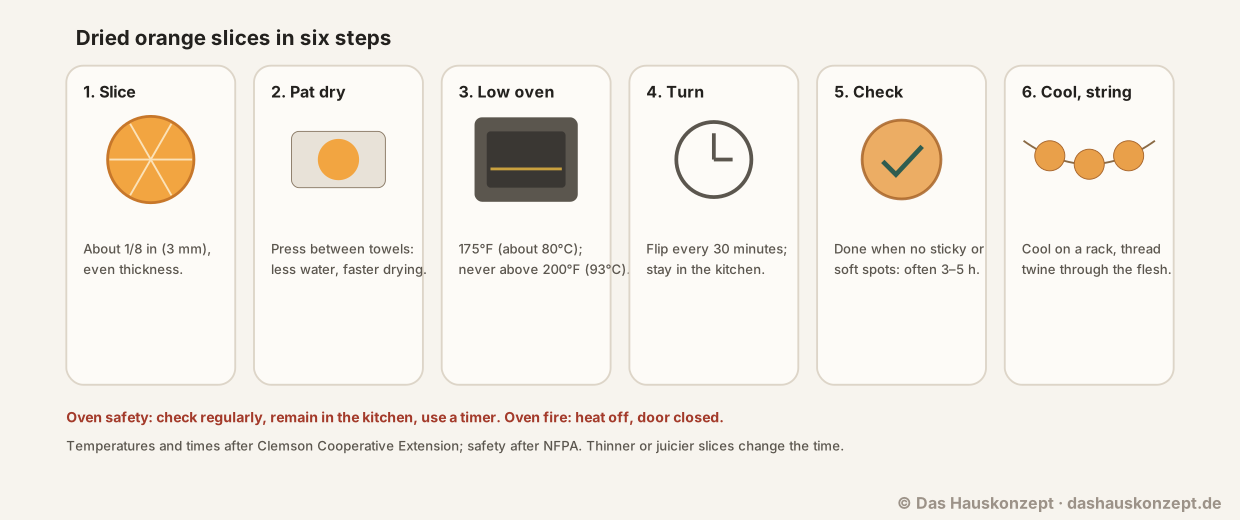
Press the slices on a clean dish towel to soak up the surface juice; less water on the slice shortens the drying time [1]. Put the wet towels away from the stovetop afterwards: NFPA lists towels among the things that can catch fire and should be kept away from a stovetop [2].
How long do orange slices take to dry in the oven?
Orange slices take 3 to 5 hours at 175°F (80°C), depending on thickness [1]. If your oven does not go that low, use its lowest setting, but not above 200°F (93°C) [1]. The full method:
Slice the oranges evenly
Cut navel oranges or other citrus into consistent slices about 1/8 inch (3 mm) thick. Thinner slices may burn and thicker ones may not dry well.[1]
1/8 in (3 mm)
Pat the slices dry
Lay the slices on a clean dish towel and pat them dry; removing surface juice shortens the drying time. Keep the towels away from the stovetop afterwards.[1]
Preheat to a low temperature
Preheat the oven to 175°F (80°C). If your oven does not go that low, use its lowest setting, but not above 200°F (93°C).[1]
175°F (80°C), max 200°F (93°C)
Arrange on parchment
Line the baking sheets with parchment paper and lay the slices out so they do not touch each other.[1]
Flip every 30 minutes
Set a timer for 30-minute intervals and flip the slices each time, which keeps them flat and stops the edges curling. Stay in the kitchen while the oven is on.[1]
every 30 min
Check for doneness
After 3 to 5 hours, depending on thickness, the slices should be totally dry with no sticky or soft places. Slices that are not can finish air-drying on a wire rack for several days.[1]
3–5 h
Cool on a rack
Move the slices to a wire rack and let them cool to room temperature before you string them or pack them away.[1]
The 30-minute timer is what turns a long, quiet bake into something you cannot forget about. Over 3 to 5 hours it goes off 6 to 10 times (3 h ÷ 30 min and 5 h ÷ 30 min), and each time you flip the slices so they stay flat and the edges do not curl [1].
Oven or dehydrator: which is better for orange slices?
The oven is faster and a food dehydrator needs less attention per hour: Clemson gives 3 to 5 hours in the oven against about 12 to 14 hours in a dehydrator at 130°F (54°C) [1]. The dehydrator still needs a flip every hour for even drying [1], so over a full run it asks for more flips, not fewer.
| What | Oven | Food dehydrator |
|---|---|---|
| Temperature [1] | 175°F (80°C); never above 200°F (93°C) | 130°F (54°C) |
| Drying time (h) [1] | 3–5 | 12–14 |
| Flip the slices [1] | Every 30 minutes | Every hour |
| Flips over the full time calculated · [1] | 6–10 (3–5 h ÷ 30 min) | 12–14 (12–14 h ÷ 1 h) |
Which fits when?
- Oven: One batch for a garland in an afternoon, when you can stay in the kitchen for the 3 to 5 hours the oven is on.
- Food dehydrator: Larger batches, or days when the oven is needed for cooking; slower, with an hourly flip over 12 to 14 hours.
How do you know when dried orange slices are done?
Dried orange slices are done when they are totally dry, with no sticky or soft places anywhere on the slice [1]. Check both the centre and the rind edge, and judge a few slices from different spots on the tray. A slice that is still tacky after the oven time does not need more heat: Clemson's advice is to let such slices air-dry on the wire rack for several days [1]. Once all of them are dry, let them cool to room temperature on the rack before stringing [1].
Is it safe to leave the oven on for hours?
Run the oven for hours only while you stay with it. NFPA's advice for baking and roasting is to check the food regularly, remain in the kitchen while it is cooking and use a timer to remind you that you are cooking [2]; unattended cooking is the leading cause of kitchen fires [2]. Do not leave the house or go to bed with the oven running. If something catches fire inside the oven, turn off the heat and keep the door closed [2].
How to string a dried orange garland
A dried orange garland is strung by threading twine through each slice with a large-eyed needle, then spacing the slices with knots. Clemson also suggests florist wire to tie slices together or attach them to wreaths and other decorations [1].
- One hole or two. Threading through the flesh near the edge lets the slice hang like a pendant; threading through two points, left and right of centre, makes it hang flat and face the room.
- Spacing. Tie a knot either side of each slice so they do not slide together, or alternate slices with natural materials such as cinnamon sticks, bay leaves or wooden beads.
- Tails. Leave a long tail at each end; you need it to tie the garland to a rod, shelf end or hook.
How many slices you need depends on the length and the spacing you choose, which makes it easy to dry the right amount in one batch:
How to hang a garland without nails
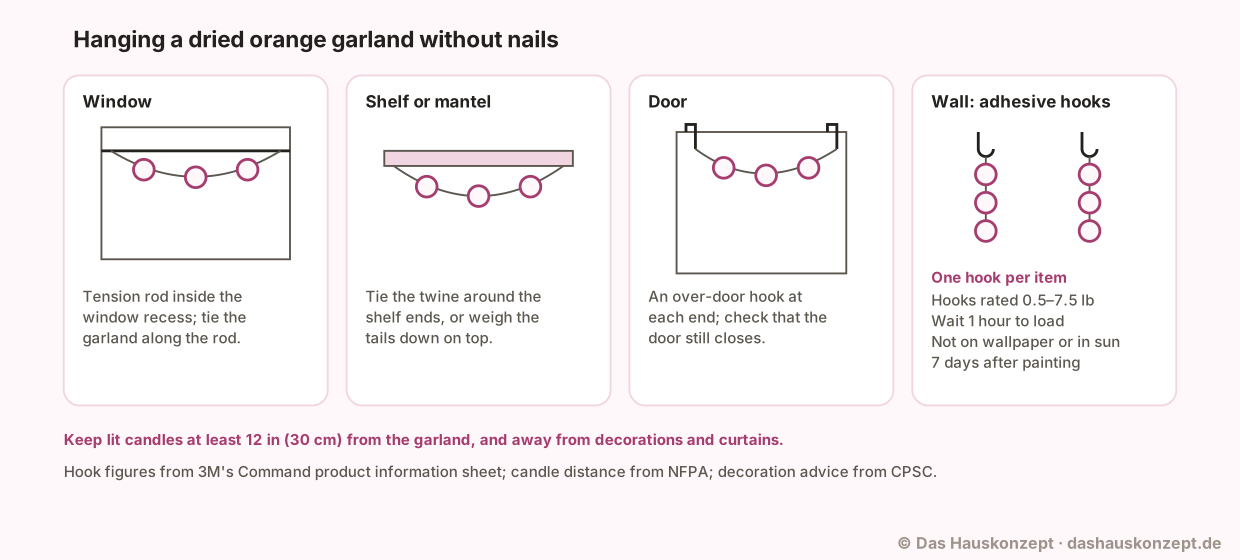
A dried orange garland weighs little, so it can hang from a tension rod, a shelf, an over-door hook or adhesive hooks instead of nails. Which one fits depends on where it goes and on the limits of the fixing:
| Where | No-nail option | What to check |
|---|---|---|
| Window | A tension rod inside the window recess, garland tied along it | That the rod is sized and fitted for the recess |
| Shelf or mantel | Twine tied around the shelf ends | No lit candles on the shelf below; keep at least 12 in (30 cm) clear [4] |
| Door | An over-door hook or wreath hanger at each end | That the door still closes over the hooks |
| Wall | Adhesive hooks within the maker's weight rating | One hook per item, so hang separate strands, each on its own hook [5] |
 (Open the diagram full size)
Adhesive hooks come with rules that matter for a garland. 3M's Command sheet rates its hooks for items from 0.5 to 7.5 lb (0.2 to 3.4 kg) depending on the hook and says to use only one hook per item hung [5]. A single garland swagged between two adhesive hooks is outside those instructions; vertical strands, each on its own hook, are not. Clean the spot with isopropyl rubbing alcohol, wait one hour before hanging anything, and do not use the strips on wallpaper or within 7 days of painting [5]. To take a hook down, stretch the tab slowly straight down along the wall at least 12 in (30 cm), never towards you; skipping the instructions can damage the surface [5].
If you need a step stool or chair to reach a window or door top, take care: CPSC counts falls as the most common holiday decorating injury, 41% of about 14,700 treated in emergency rooms in one holiday season [3].
Keeping a dried orange garland away from candles and heat
A dried orange garland is a dry decoration that can burn, so it belongs well away from flames and heat. NFPA advises keeping candles at least 12 inches (30 cm) from anything that can burn, and reports that over half of candle fires started when something flammable, such as home decorations or curtains, was too close [4]. CPSC likewise says to place lit candles away from decorations, curtains and furniture, and to put them out before leaving the room [3].
Flameless candles are an alternative NFPA suggests [4]. If you wind a string of lights through the garland, CPSC says to use only lights tested by a nationally recognized testing laboratory and to check each set, new or old, for broken or cracked sockets, frayed or bare wires and loose connections [3]. CPSC's advice for Christmas trees is to keep them away from fireplaces, vents and radiators [3]; we apply the same caution to a dried garland over a fireplace that is in use.
How to store a dried orange garland for next year
A dried orange garland keeps best in an airtight container in a cool, dark place, the storage Clemson gives for dried slices, which it says can last several years [1]. Lay the garland in loose coils so the slices do not crack against each other, and store any spare slices the same way for repairs.
Common questions
Why did my dried orange slices turn brown?
Browning is a sign of scorching, which comes from slices cut too thin or an oven set too hot. Clemson Extension notes that slices that are too thin will burn, recommends 175°F and says not to go above 200°F, so cut evenly at about 1/8 inch and use the lowest setting your oven allows; a dehydrator at 130°F gives less chance of burning.[1]
Can you eat dried orange slices?
Yes, Clemson Extension lists eating them as one use for slices dried this way. A garland that has hung in the room for weeks is decoration, though, so dry a separate batch for eating and keep it in an airtight container.[1]
Can you air-dry orange slices without an oven?
Clemson Extension gives air-drying only as a finishing step: slices that still have soft or sticky spots after the oven can dry on a wire rack for several days. For drying from fresh, it gives the oven method and a dehydrator at 130°F.[1]
Can I stick adhesive hooks to a window to hang the garland?
Only on a pane that stays out of the sun. 3M's Command sheet says the strips are not for use in direct sunlight, should be applied above 50°F (10°C), and that the adhesive could soften above 105°F (40°C). A tension rod inside the window recess avoids the problem.[5]
Sources and method
How this article was made: Opened and read on 2026-10-14: Clemson Cooperative Extension's guide to drying oranges for decorations, NFPA's cooking and candle safety pages, CPSC's 2017 holiday decorating release and 3M's Command product information sheet. Slice counts and timer rounds are our own arithmetic on Clemson's figures, shown on the page. No calculator applies. Nothing was tested or dried for this page; no source gives garland weights, so none are stated.
What this article adds: Turns Clemson's oven and dehydrator settings into a side-by-side comparison with flip counts, works out how many slices a garland length needs, and matches each no-nail hanging option to the maker's limits, including the one-hook-per-item rule, in an original diagram.
Use of AI: Revised with AI assistance; every source was opened and checked on 2026-10-14; editorially reviewed before publication.
Editorially reviewed by Anna Muller on 11 October 2026 before publication.
- Drying Oranges for Holiday Decorations (December 5, 2024) , Clemson Cooperative Extension, Home & Garden Information Center. checked Supports: Navel oranges or other citrus such as limes, lemons or grapefruit; consistent 1/8-inch slices (thinner may burn, thicker may not dry well); pat dry on a clean dish towel to shorten drying time; preheat to 175°F or the lowest setting but not over 200°F; parchment-lined sheet, slices not touching; timer at 30-minute intervals, flip to keep them flat and prevent curled edges; 3 to 5 hours depending on thickness; done when totally dry without sticky or soft places, otherwise air-dry on the rack for several days; dehydrator at 130°F for about 12 to 14 hours, flipping every hour, with less chance of burning; cool on a wire rack; store airtight in a cool, dark place, can last several years; uses include garlands, wreaths, florist wire, and eating them.
- Safety with cooking equipment , National Fire Protection Association (NFPA). checked Supports: If you are simmering, baking or roasting food, check it regularly, remain in the kitchen while food is cooking, and use a timer to remind you that you are cooking; keep anything that can catch fire (oven mitts, wooden utensils, food packaging, towels or curtains) away from your stovetop; if you have a cooking fire, get out, close the door behind you and call 9-1-1 or the local emergency number after you leave; for an oven fire, turn off the heat and keep the door closed; the leading cause of kitchen fires is unattended cooking.
- Put Safety at the Top of Your List When Decorating this Holiday Season (news release, December 6, 2017) , U.S. Consumer Product Safety Commission. checked Supports: Place lit candles away from items that can catch fire such as trees, decorations, curtains and furniture; keep burning candles within sight and extinguish them before leaving the room; only use lights tested for safety by a nationally recognized testing laboratory and check each set for broken or cracked sockets, frayed or bare wires and loose connections; place the tree away from heat sources like fireplaces, vents and radiators; about 14,700 holiday decorating injuries treated in emergency rooms during the previous November–December holiday season, with falls the most common (41%); use caution when standing on a ladder or a chair to hang decorations.
- Safety with candles , National Fire Protection Association (NFPA). checked Supports: Keep candles at least 12 inches from anything that can burn; blow out all candles before you leave a room or go to bed; think about using flameless candles; over half of all candle fires started when a flammable item such as home decorations, curtains or paper was too close to the lit candle; Christmas is the peak day for candle fires.
- Command Adhesive Products, product information sheet (March 2011) , 3M Construction and Home Improvement Markets Division. checked Supports: Hooks hold items from 0.5 to 7.5 lbs; clean the surface with isopropyl rubbing alcohol and let dry, no household cleaners; wait one hour before hanging items; remove by slowly stretching the tab straight down along the wall at least 12 inches, never towards you; failure to follow instructions may result in damage; do not use with wallpaper; use only one hook per item hung; apply to surfaces above 50°F (10°C); adhesive could soften above 105°F (40°C); not for use in direct sunlight; wait at least 7 days on freshly painted surfaces; not recommended for bare wood or porous, unpainted surfaces.