Guide · How-to
How to use tension rods safely: span, load and surfaces
Applies to: USRentersOwners Lengths and load ratings are from named products' instructions; the pack for your own rod always overrides them.
This page is only available in English. The language switch leads to the closest German page.
In short
Use a tension rod only where its stated length range covers the span measured at the rod's exact height, between two hard, flat surfaces facing each other. Set it slightly longer than the opening: Kenney says 1 to 1.5 in (2.5–3.8 cm) for its spring shower rods. Keep the load within the product's rating, because the further a rod is extended, the less it holds.
At a glance
| What | Value | Basis |
|---|---|---|
| Maximum load, allen + roth curved shower rod | 15 lb6.8 kg, evenly distributed; rod adjusts from 44 to 72 in (112–183 cm) | [4] |
| Extra length, RoomDividersNow standard rod | 1–2 in2.5–5.1 cm longer than the distance between the walls | [7] |
| Extra length, long rod in a 120–130 in space | 1.75–3 in4.4–7.6 cm; space 10 ft to 10 ft 10 in (3.05–3.30 m); the maker says the rod may bend beyond this | [8] |
| Extra length, long rod in a 140–150 in space | 4–5 in10.2–12.7 cm; space 11 ft 8 in to 12 ft 6 in (3.56–3.81 m); 130–140 in spaces take 3–4 in | [8] |
| Kirsch spring tension rod lengths | 8–72 in20–183 cm; steel, inside mount, stationary curtains; the spec sheet gives no load rating | [9] |
Contents
- How does a tension rod hold?
- What size tension rod do I need?
- How much longer than the opening should a tension rod be?
- Spring, camlock or threaded: which tension rod should I choose?
- How to install a tension rod step by step
- How much weight can a tension rod hold?
- Which surfaces does a tension rod work on?
- When should you not use a tension rod?
- Tension rod checklist before you load it
- Common questions
- Sources and method
Tension rods are one of the few ways to add a curtain, a rail or a shelf support without drilling, and they avoid the permanent damage a screwed rod leaves when it comes down [1], which makes them popular in rentals. They are also easy to get wrong: a rod near the end of its range, or pressed against a slippery tile edge, can come down the first time someone hangs a wet towel on it.
How does a tension rod hold?
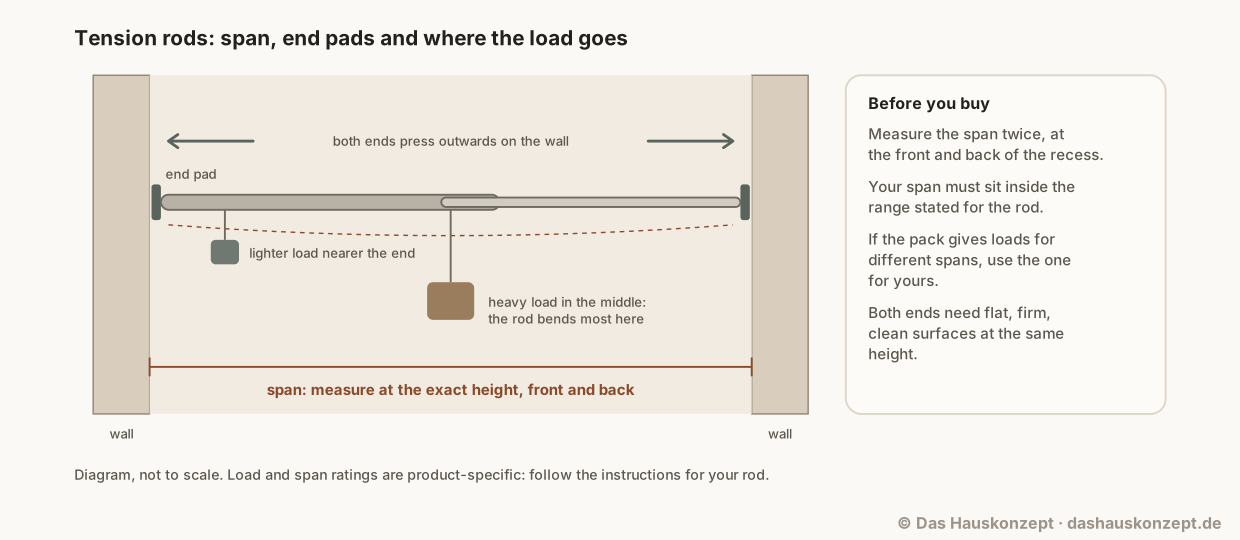
A tension rod holds by pushing outwards against two facing surfaces, and the friction of its end caps on those surfaces keeps it from sliding down. Inside the tube, a spring or a threaded mechanism creates that outward force [2].
 (Open the diagram full size)
In a spring rod, the compressed spring supplies the force; in a threaded rod, the two shafts are turned on a threaded stud until enough force acts on the support surfaces to hold the rod in place [1]. Rubber heads on the end caps increase friction between rod and wall and can reduce damage to it [2]. Everything you hang pulls the rod downwards, so it stays up only while the grip is greater than the pull. Three things decide that: how firmly the rod presses, what it presses against, and how much weight you add.
The same patent notes the trade-off behind cheap spring rods: because spring strength has to be balanced against ease of use, weight support is often sacrificed [1]. That is why the load rating on the pack matters more than the look of the rod.
What size tension rod do I need?
The right tension rod is one whose stated length range includes your span with some reserve, because a rod extended to its full length won't hold up very much weight at all [3]. Measure first, then compare your span with the range printed on the pack.
Measure between the two surfaces at the exact height where the rod will sit. Take one reading at the front and one at the back of the recess: walls are rarely perfectly parallel, and the rod has to fit the line where it will actually sit. Smart Home Products tells you to buy a rod that is longer than your measurement [3].
Ranges vary widely between products, which is why the pack, not a rule of thumb, decides:
| Product (instructions opened) | Stated length | Stated load |
|---|---|---|
| Kirsch spring tension rod, inside window frame | 8–72 in (20–183 cm) [9] | None given on the spec sheet [9] |
| allen + roth curved shower rod, tension or drilled | 44–72 in (112–183 cm) [4] | 15 lb (6.8 kg), evenly distributed [4] |
| RoomDividersNow long two-piece rod | Spaces 120–150 in (3.05–3.81 m) [8] | None given in the sheet [8] |
If a rod's sheet gives no load figure at all, treat it as a rod for light curtains only and ask the maker before hanging anything heavier.
How much longer than the opening should a tension rod be?
A tension rod is set slightly longer than the opening so that it is compressed when it sits in place; how much longer depends on the rod type and the span, and each maker gives its own figure. Kenney extends its spring shower rods 1 to 1.5 in (2.5–3.8 cm) beyond the opening, then compresses the ends and releases the rod into place [5].
| Rod and span | Extra length the maker gives |
|---|---|
| Kenney spring shower rod | 1–1.5 in (2.5–3.8 cm) beyond the opening [5] |
| RoomDividersNow standard rod | About 1–2 in (2.5–5.1 cm) longer than the distance between the walls [7] |
| RoomDividersNow long rod, 120–130 in space | 1.75–3 in (4.4–7.6 cm) [8] |
| RoomDividersNow long rod, 130–140 in space | 3–4 in (7.6–10.2 cm) [8] |
| RoomDividersNow long rod, 140–150 in space | 4–5 in (10.2–12.7 cm) [8] |
| Kenney camlock rod | No figure given: extend against both walls at an angle, twist to lock, then level it to tension [6] |
| allen + roth threaded rod | Extend to the measured length, then turn the tightening sleeve to apply tension [4] |
Longer spans need more extra length in the RoomDividersNow sheet, and the maker warns that the rod may bend if it is extended beyond those bands [8]. Kenney's camlock sheet points the same way: more angle at longer extensions for greater hold, less or no angle at shorter ones [6].
Spring, camlock or threaded: which tension rod should I choose?
The three common tension rod mechanisms differ in how the length is held: a spring rod keeps pushing, a camlock rod locks at a fixed length, and a threaded rod is screwed out until it is tight. Kenney describes the difference as a spring that expands and contracts as your walls do, against a lock that keeps the rod at a static length [5].
| Type | How you fit it | What to watch |
|---|---|---|
| Spring | Set slightly longer than the opening, compress the ends, release into place [5] | Weight support is often sacrificed for easy fitting [1] |
| Camlock | Extend against both walls at an angle, twist to lock, level to tension [6] | Use more angle at longer extensions [6] |
| Threaded (twist or sleeve) | Extend to the span, then turn until it presses firmly [4] | Do not overtighten [4] |
For a light café curtain inside a window frame, a spring rod is the usual choice; Kirsch describes its spring rod as ideal for mounting inside a window frame [9]. For a shower curtain or a long room divider, a rod with a stated load rating and a lock or thread gives you more control over how firmly it is set.
How to install a tension rod step by step
Installing a tension rod takes a tape measure, two clean contact surfaces and the maker's sheet; allen + roth lists a tape measure as the only tool for its tension installation [4]. The steps below follow the instruction sheets cited and work for spring, camlock and threaded rods.
Measure the span at the rod's exact height
Measure between the two surfaces at the height where the rod will sit, once at the front and once at the back of the recess, because walls are rarely perfectly parallel. If the two readings differ, decide exactly where the rod goes and use the reading from that line.
Two readings, front and back, at the same height
Check the stated range and the load rating
Your span must sit inside the length range printed for the rod, and the weight you plan to hang must stay within its weight capacity. A rod extended to its full length holds very little, so a rod whose range ends well past your span is the safer choice.[3]
Clean and check both contact surfaces
Both ends need hard, flat surfaces that face each other. Wipe off grease and soap residue, and move the rod off grout lines, rounded tile edges and anything soft or crumbly.[3]
Set the length slightly longer than the span
Follow the sheet for your rod type. Kenney extends its spring shower rods 1 to 1.5 in (2.5–3.8 cm) beyond the opening; RoomDividersNow sets its standard rod 1 to 2 in (2.5–5.1 cm) longer than the distance between the walls; a threaded rod such as allen + roth's is extended to the measured length and then tightened in place.[5]
Fit the rod level and set the tension
Spring rod: compress the ends, place it and let it expand. Camlock rod: extend it against both walls at an angle, twist to lock and level it to tension. Threaded rod: turn the tightening sleeve to apply tension. Set enough tension to hold firmly, but not so much that the rod bends; do not overtighten.[7]
Load-test before you rely on it
Pull down lightly on the rod to check it is secure, mark the position of both ends with a pencil or tape, then add the load gradually. Look again once it has carried the load for a while; if an end has moved off its mark, take the load off and reset the rod.[7]
Set enough tension that the rod stays firmly in place, but not so much that it bends; if it slips on the wall, it needs more tension, so lengthen it a little more [7]. On a long rod, a second person makes fitting easier [8]. Over a bathtub, do not stand on the tub ledge to reach [4].
How much weight can a tension rod hold?
A tension rod holds only what its maker states for that model, and there is no general figure: allen + roth rates its 44–72 in curved shower rod at 15 lb (6.8 kg) evenly distributed [4], while Kirsch's spring rod sheet gives no load at all [9].
Two rules from the sources apply to every rod:
- The longer the extension, the weaker the rod. Smart Home Products says the further you expand a tension rod, the weaker it becomes, and that fully extended it won't hold very much weight [3].
- Ratings assume an even load. allen + roth's figure is for weight evenly distributed along the rod [4]. A load hung at one point, such as a heavy bag in the middle, works the rod harder than the same weight spread along it.
If you will hang heavy items, Smart Home Products says to choose a rod with a larger weight capacity [3]. Wet fabric weighs more than dry, so judge a shower curtain or a towel rail by its wet weight, not its weight off the shelf.
Which surfaces does a tension rod work on?
A tension rod works between two hard, flat surfaces that face each other [3], such as the sides of a window recess, an alcove or a tiled shower opening. Both ends should sit at the same height and on the same kind of surface.
- Good: painted plaster or drywall that feels firm, smooth tile, the inside faces of a solid window frame; Kirsch's spring rod is made for mounting inside a window frame [9].
- Check first: drywall and soft plaster take less pressure than tile, so keep the end caps or pads that come with the rod and do not overtighten [4]; rubber heads add grip and can reduce damage [2], and Kenney's non-slip, non-scratch caps help protect wall and tile [5].
- Avoid: grout lines, the rounded edge of a tile, crumbly plaster, wallpaper that can tear away, glass shower screens and thin trim that was never meant to take outward pressure.
Clean both contact spots before fitting. Grease and soap residue reduce the friction the rod relies on, especially in a kitchen or bathroom.
When should you not use a tension rod?
A tension rod is the wrong fixing wherever a slip would be dangerous or the load is heavy or keeps growing; the patent literature itself notes that weight support is often sacrificed in spring rods [1].
- Heavy or growing loads, such as a rail full of winter coats or a shelf of books.
- Where a fall would hurt someone, such as above a bed or a cot, or above the place where you stand in the shower.
- Where children can hang or swing on it.
- Uneven, soft or crumbly surfaces at either end, or surfaces that are not parallel enough for both end caps to sit flat.
In those cases, a rail screwed into solid wall or studs, a freestanding rack or a different storage method is the better choice. Some shower rods, like allen + roth's, can be fitted either by tension or with screws and drywall anchors [4]. Renter-friendly does not have to mean no holes at all; a few well-placed holes are often easier to repair than a fallen rod.
Tension rod checklist before you load it
The checklist below covers the three moments that decide whether a tension rod stays up: buying it, fitting it and loading it. Print it and tick it off at the recess.
Before you buy
Before you fit
Before you load it
Common questions
Will a tension rod damage walls or tile?
Usually not permanently: a tension rod avoids the screw holes of a fixed rod, and rubber or non-slip end caps add friction and help protect the wall and tile. RoomDividersNow notes that smudge marks from the end caps can be cleaned off with a household cleaner. Pressing a rod against a soft or crumbly surface can still dent it, so check the surface first.[5]
Why does my tension rod keep falling down?
Most often the tension is too low. RoomDividersNow says a rod that slips on the wall needs more tension, so lengthen it a little more; allen + roth's troubleshooting for its threaded rod points to loose set screws or a tightening sleeve that is not tight. Also check that the load is within the rating and the rod is not near the end of its range.[7]
Which way do you twist a tension rod to unlock or lengthen it?
Twist the two tubes in opposite directions. Smart Home Products says to grip the rod either side of the centre seam and twist the poles in opposite directions to unlock it; RoomDividersNow lengthens its rod by holding one side and turning the other counterclockwise. Hold both ends firmly once it is unlocked so the spring does not push the rod wider than the space.[3]
Sources and method
How this article was made: Opened and read: two US patents on tension rod mechanisms, installation sheets from Smart Home Products, allen + roth (curved shower rod), Kenney (camlock sheet and shower rod buying guide) and RoomDividersNow (standard and long rods), and Kirsch's spring tension rod spec sheet. Metric conversions and the worked examples are our arithmetic on the makers' figures. No rod was installed or load-tested for this guide, and no source gives a general load rule, so none is stated.
What this article adds: Puts the makers' extra-length allowances and load ratings side by side by rod type and span, and works two examples that turn a measured opening into the length to set the rod to.
Use of AI: Revised with AI assistance; every source was opened and checked on 2026-10-14; editorially reviewed before publication.
Editorially reviewed by Anna Muller on 11 October 2026 before publication.
- US8827587B2: Tension rod mechanism with opposing threads , Google Patents (US patent, original assignee Zenith Products Corp.). checked Supports: Tension rods are an alternative to rods permanently fixed to support surfaces with screws or bolts, which provides simpler installation and prevents permanent damage to the support surfaces upon removal; spring strength must be balanced between user friendliness and supporting sufficient weight, so weight support is often sacrificed; in threaded rods the shafts house a threaded stud and are rotated until sufficient force is applied against the support surfaces to hold the rod in place; in spring rods the force of the compressed spring holds the rod.
- US9968212B1: Tension rod and room divider assembly , Google Patents (US patent). checked Supports: Tension rods generally contain spring-loaded mechanisms that create an outwardly-projecting force within the rod; rubber heads on the end caps increase friction between the rod and the wall and can reduce damage to a wall.
- Curtain Rod – Spring Fit: Preparation and Fixing Instructions , Smart Home Products (Windoware). checked Supports: A tension rod needs to be placed between 2 hard, flat surfaces that face opposite one another; buy a rod longer than your measurement; the longer you expand it the weaker it becomes, and at full length it won't hold up very much weight; check the weight capacity and use a larger capacity for heavy items; twist the poles in opposite directions either side of the centre seam to unlock and hold both ends firmly so it does not expand wider than the space.
- 44-in to 72-in Curved Shower Rod, models SHLSNC01SN/CH/BR/MB/SG (instruction manual) , allen + roth (Lowe's). checked Supports: Rod adjusts from 44 in to 72 in; tension or permanent (drilled) installation; do not stand on bath tub ledge; do not overload, the maximum weight capacity is 15 lbs. evenly distributed; tension installation: measure, extend to the recorded length, tighten the set screws, then rotate the tightening sleeve to apply tension, do not overtighten; tape measure is the only tool required for tension installation; troubleshooting: a rod falling from the wall means the set screws in the threaded collar or the tightening sleeve are not tight.
- Shower Rods Buying Guide (Twist & Fit spring tension and camlock tension) , Kenney Manufacturing Company. checked Supports: Spring tension uses a spring mechanism that expands and contracts as your walls expand and contract; camlock tension uses a locking mechanism to keep the rod at a static length; spring tension installation: extend rod 1-1.5 in (3.8 cm) beyond the width of your shower opening, then compress the ends together and release into place; camlock installation: extend against both walls at an angle, twist to lock and level rod into place; non-slip, non-scratch end caps help protect wall and tile from damage; measure the shower opening to determine the best fit.
- Installation Instructions, camlock shower rod 79-CamShwr1-ECOM , Kenney Manufacturing Company. checked Supports: 1 Extend rod against both walls at angle; 2 Twist to lock; 3 Level rod to tension; more angle at longer extensions for greater hold, less or no angle at shorter extensions.
- Tension rod installation instructions (standard rod) , RoomDividersNow. checked Supports: Lengthen the rod to approximately 1 to 2 inches larger than the distance between the walls by holding one side and turning the other counterclockwise; push it against the opposite wall so it reduces in size, bring the near end to its final position and release; make sure the rod has enough tension to stay firmly in place but not so much that it might bend; if the rod slips on the wall it needs more tension, so lengthen it a bit more; lightly pull down on the rod and curtain to make sure it is secure; smudge marks on the wall can be cleaned off with a common household cleaner.
- Tension rod installation instructions (long two-piece rod) , RoomDividersNow. checked Supports: For a strong hold extend the rod within these ranges: spaces 120 in to 130 in wide, 1.75 in to 3 in wider than the space; 130 in to 140 in, 3 in to 4 in wider; 140 in to 150 in, 4 in to 5 in wider; the tension rod may bend if extended beyond these ranges; set enough tension to stay firmly in place but not so much that the rod bends; a second person can help with the setup.
- Spring Tension Rod (spec sheet v5.20) , Kirsch Drapery Hardware. checked Supports: Ideal for mounting inside a window frame; pole lengths 8 in to 72 in; steel; pole sizes 7/16 in and 5/8 in; stationary operation; inside mount; no brackets; does not bend or curve; the sheet gives no load rating.