Guide · How-to
How to hang a peg rail: wall check, fixings and spacing step by step
Applies to: USUKRentersOwners2010 ADA Standards 308 Stud spacing and reach ranges are US figures; the cable-route rule is UK guidance. Plug sizes and the screw rule are fischer's.
This page is only available in English. The language switch leads to the closest German page.
In short
Screw a peg rail into wall studs, traditionally 16 in (40.6 cm) on center in US wood framing, or into solid masonry with plugs matched to the screw. Between studs, use drywall anchors rated by their maker. Identify the wall and scan for cables and pipes first, then mark the rail level, drill, fix it and add weight gradually.
At a glance
| What | Value | Basis |
|---|---|---|
| Stud spacing in advanced framing | 24 in61.0 cm on center, with 2x6 studs; the traditional spacing is 16 in with 2x4s (US wood framing) | [3] |
| Drywall thickness more common in homes | 1/2 in12.7 mm; 5/8 in (15.9 mm) board holds more, because the board is what usually fails | [5] |
| Adult reach range (ADA 308) | 15–48 in380–1220 mm above the floor, forward or side reach; a US accessibility rule, used here as a yardstick | [4] |
| Highest reach for children aged 5 to 8 | 40 in1015 mm; 36 in (915 mm) for ages 3 and 4, 44 in (1120 mm) for ages 9 to 12 (ADA advisory 308.1) | [4] |
| Screw length, 6 × 30 mm plug and 3/4 in rail | 54 mmAbout 2 1/8 in; 30 mm plug + 19 mm rail + 5 mm screw diameter, fischer's rule | calculated · [1] |
| Studs a 36 in rail always reaches at 24 in spacing | 1 stud36 ÷ 24 = 1.5, rounded down; at 16 in spacing it is 2 | calculated · [3] |
| Homes more likely to have lead paint | before 1978Built before 1978 (US EPA); drilling dust from old paint needs care | [7] |
Contents
- How to hang a peg rail step by step
- What kind of wall do you have?
- How to find studs for a peg rail
- Where cables and pipes run in a wall
- Which fixings to use for a peg rail
- How long should the screws be?
- How high to hang a peg rail
- How far apart to space the pegs and fixings
- Hanging a peg rail in a rental
- Checklist before you drill
- Common questions
- Sources and method
A peg rail holds what its fixings and the wall behind it can hold, not what the pegs look like they can take. Whether it still carries a wet winter coat and a full backpack in a year depends on two things you cannot see from the front: what the wall is made of, and where the screws go into it.
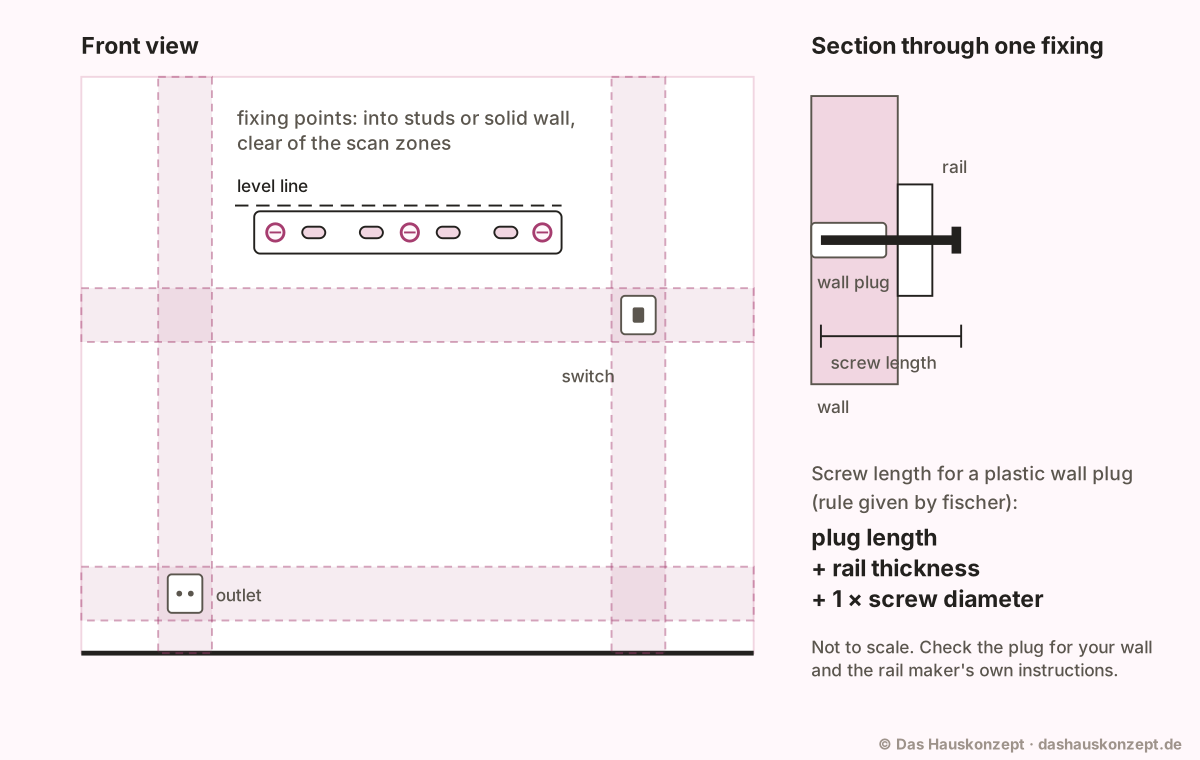 (Open the diagram full size)
How to hang a peg rail step by step
Hanging a peg rail takes seven steps, from choosing the height to a gradual load test, and the order matters: the wall check and the scan come before you buy screws or drill. The sections below explain the decisions behind each step.
Decide the height and the spot
Hang your longest coat on a hook at the height you have in mind and check that the hem clears the bench, shoe cabinet or floor below. Keep the rail out of any door swing and leave a walking path past the coats. If children should reach their own pegs, plan a second, lower rail within their reach range.[4]
Find out what the wall is made of
Knock along the wall. A dull sound all along suggests solid masonry; a hollow sound between solid spots suggests drywall on studs. To confirm, drill one small test hole where the rail will cover it, but only once the scan in the next step shows that spot is clear; red, grey or white dust means masonry.
Scan for studs, cables and pipes
Run the detector over the whole area the rail and its screws will cover. Mark stud centers, and mark any cable or pipe. Treat the lines straight above, below and beside switches and outlets as likely cable routes, and move the rail if a fixing lands on one.[2]
Choose the fixings and the screw length
Use wood screws into studs, plugs in solid walls and anchors rated for drywall between studs. For a plastic plug, match the screw diameter to the plug and make the screw as long as the plug plus the rail thickness plus one screw diameter.[1]
Screw length = plug length + rail thickness + 1 × screw diameter
Mark the rail level
Hold the rail in place, set the level on top and draw a light line along the top edge. Mark the fixing points through the rail's holes, take the rail down and check each mark with the detector again.
Drill and fix
Drill at each mark to the diameter and depth printed on the plug or anchor pack, with the hammer setting only in masonry. Vacuum the holes, push plugs in flush, then drive the screws until the rail sits tight without spinning a plug or crushing the board.[1]
Load it gradually
Hang one coat, then a bag, and look for movement at the screws or a gap opening behind the rail. If a fixing moves, take the load off and refit it instead of adding weight; nothing should hang from a loose anchor.[5]
What kind of wall do you have?
The wall decides the fixing, so find out what it is before you buy anything. Most walls in a home fall into one of three types:
- Solid wall (brick, block, concrete or stone, usually plastered): sounds dull when you knock, and a masonry bit brings out red, grey or white dust.
- Hollow wall (drywall, also called plasterboard, on a timber or metal frame): sounds hollow between the frame members and solid over them. Plasterboard is less load-bearing than a solid wall because it is thin and porous [6].
- Mixed: drywall can also be glued or fixed onto masonry with a gap behind it. If a small test hole goes through board and then hits something hard, choose a fixing long enough to reach and suit the solid layer.
If you are unsure, drill one small test hole in a spot the rail will cover anyway, after the detector shows that spot is clear of cables and pipes.
How to find studs for a peg rail
A peg rail on a drywall wall is strongest when its screws go into the wood studs behind the board. In US wood-framed houses, studs have traditionally been 2x4s at 16 in (40.6 cm) on center; code allows wider spacing, and advanced framing uses 2x6 studs at 24 in (61.0 cm) on center [3]. Find one stud with the detector, confirm it with a small pilot hole, then measure along the wall to predict the next and confirm that one too. A strong magnet run along the wall will often stick to the screws that hold the board to the studs.
The spacing decides how many studs a rail of a given length can reach. Divide the rail length by the stud spacing and round down: that is the number of studs it always crosses, wherever it sits (one fewer only if both ends land exactly on studs).
| Rail length | Studs reached at 16 in (40.6 cm) | Studs reached at 24 in (61.0 cm) |
|---|---|---|
| 24 in (61.0 cm) | 1 | 1 |
| 36 in (91.4 cm) | 2 | 1 |
| 48 in (121.9 cm) | 3 | 2 |
| 60 in (152.4 cm) | 3 | 2 |
| 72 in (182.9 cm) | 4 | 3 |
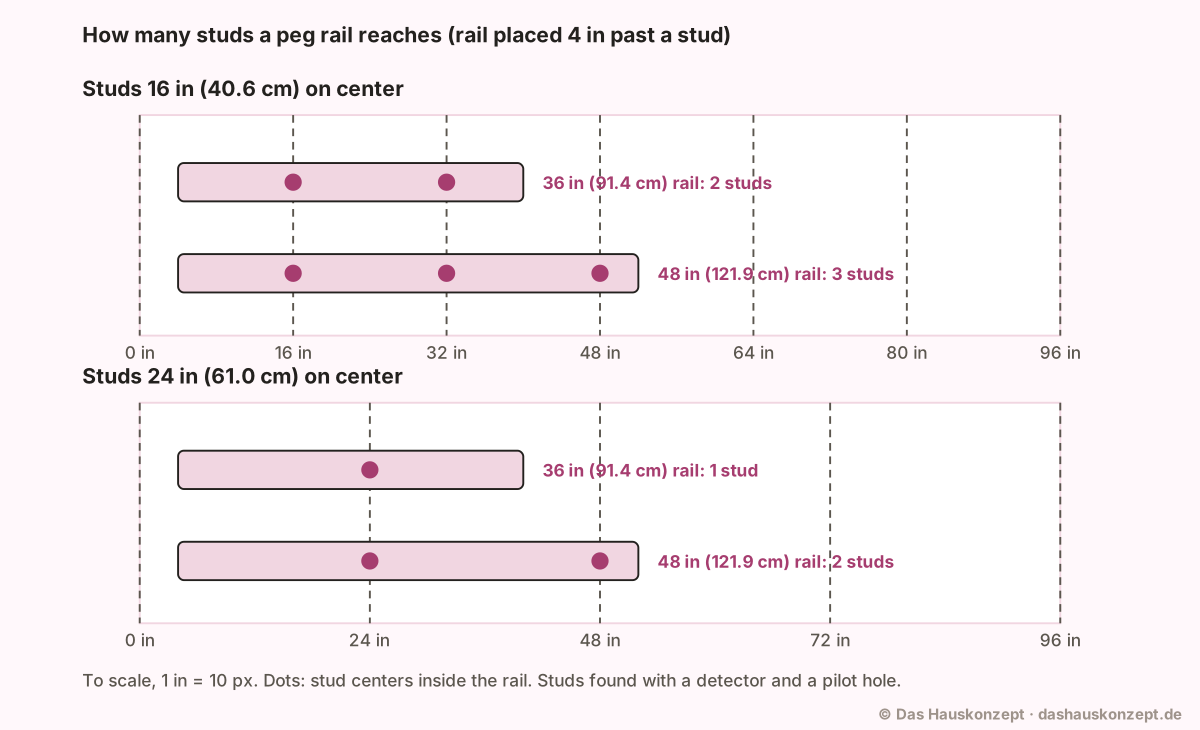 (Open the diagram full size)
A rail that reaches only one stud needs drywall anchors for its other fixings, or a longer backing board screwed to two studs with the rail fixed to that. The rail's own holes rarely line up with the studs, so plan to drill new holes in the rail where the stud centers fall.
Where cables and pipes run in a wall
Cables usually run straight up, down or sideways from outlets and switches, so the bands directly above, below and beside them are where a screw is most likely to hit one. Electrical Safety First, a UK charity, says cables buried in walls are installed horizontally or vertically from sockets and switches, that drilling into hidden cables is a common DIY error, and that a cable detector helps find them before you start; it also advises switching the power off at the panel for DIY near electrics [2].
That rule is UK guidance, and older homes, other countries and later alterations can differ. Water pipes follow their own routes: fischer advises checking for electrical or water pipes behind the wall before drilling [6]. Scan the whole area the rail and its screws will cover, mark anything the detector finds, and move the rail if a fixing point lands on or near it.
Which fixings to use for a peg rail
The right fixing for a peg rail depends on what is behind each screw: a stud, solid masonry, or drywall with a cavity behind it.
| Behind the screw | Fixing | What to watch |
|---|---|---|
| Wood stud | Wood screw straight through the rail into the stud, no plug | Confirm the stud with a pilot hole before committing |
| Solid masonry | Plastic wall plug with a matched screw | Screw diameter must suit the plug size [1] |
| Drywall between studs | Anchor made and rated for drywall | Spread anchors out; rated loads belong to that anchor in that board [5] |
Some universal plugs work in both solid and hollow materials: fischer describes its DuoPower plug as adjusting to the material by expanding, folding or knotting, and lists concrete, solid brick, natural stone and gypsum plasterboard among the materials [1].
Drywall anchors need extra care under a peg rail, because pegs hold coats out from the wall. WallClaw, an anchor maker, says cantilevered items reduce load capacity substantially, that anchors placed too close together weaken the board instead of adding capacity, and that 5/8 in (15.9 mm) drywall holds more than the 1/2 in (12.7 mm) board more common in homes [5]. It also notes that makers do not all define "maximum" or "recommended" load the same way [5]. Use the figures on the pack for your wall type, read what kind of load they are, and keep well inside them if heavy bags or children swinging on pegs are likely.
How long should the screws be?
For a plastic wall plug, the screw should be as long as the plug plus the thickness of the rail plus one screw diameter, according to fischer [1]. The same maker says the smooth, unthreaded part of the screw must not be longer than the board you are fixing [1]. Measure the rail where the screw passes through, not at the pegs.
fischer's DuoPower sizes show how screw and plug go together [1]:
| Plug (drill) diameter | Screw diameter |
|---|---|
| 5 mm (0.20 in) | 3.0–4.0 mm |
| 6 mm (0.24 in) | 4.0–5.0 mm |
| 8 mm (0.31 in) | 4.5–6.0 mm |
| 10 mm (0.39 in) | 6.0–8.0 mm |
Drill to the diameter and minimum depth printed for your plug; the maker's tables give both, along with the load per wall type [1]. For drywall anchors, use the screw that comes with the anchor, since the tested load may not hold with a different one [5].
How high to hang a peg rail
The right height for a peg rail comes from what will hang on it: hang your longest coat on a hook at the height you plan and check that the hem clears anything below, such as a bench, a shoe cabinet or the floor. Hanging coats stick out further from the wall than the rail, so also check that a walking path stays clear past them and that no door swings into them.
For people who should reach the pegs from a wheelchair or as children, the US ADA reach ranges are a useful yardstick, even though they are written for public buildings, not homes [4]:
| Who reaches the pegs | Highest reach | Lowest reach |
|---|---|---|
| Adults (forward or side reach) | 48 in (1220 mm) | 15 in (380 mm) |
| Children 9 to 12 | 44 in (1120 mm) | 16 in (405 mm) |
| Children 5 to 8 | 40 in (1015 mm) | 18 in (455 mm) |
| Children 3 and 4 | 36 in (915 mm) | 20 in (510 mm) |
Put the top of the peg, where the strap sits, at or below the highest reach. A second, lower rail for children usually works better than one rail at a compromise height, because adult coats on a low rail drag on the floor.
How far apart to space the pegs and fixings
Space the fixings by the studs and the pegs by what hangs on them. Screws go where the stud centers fall, or into masonry wherever the scan is clear. Three fixings, one near each end and one in the middle, keep a longer rail from bowing; a short rail with two fixings near the ends is usually enough if each goes into a stud or solid wall.
For pegs on a blank board you drill yourself, divide the rail length by the number of pegs and start half a space in from each end, so the gaps are even. A 36 in rail with four pegs gives 36 ÷ 4 = 9 in (22.9 cm) between pegs and 4.5 in (11.4 cm) at each end. Fewer, wider-spaced pegs suit bulky winter coats; closer pegs suit bags, leashes and keys.
Hanging a peg rail in a rental
Before you drill a rented wall, check your lease or ask your landlord, and keep the answer in writing. Note which fixings you used so you can fill the holes properly when you move out. In a home built before 1978, lead-based paint is more likely, even a small amount of dust can pose health risks, and the US EPA advises wet mopping rather than dry sweeping; for work that disturbs paint in such a rental, the landlord must follow the federal RRP Rule [7]. If drilling is not allowed, a freestanding coat stand, an over-the-door rack or light-duty adhesive hooks are the alternatives.
Checklist before you drill
Print this checklist and tick it off before the first hole; every item is a reason peg rails come loose or hit something they should not.
Before you drill
If you rent or live in an older home
Common questions
What should I do if I drill into a wire?
Stop drilling and switch the power off at the breaker panel; Electrical Safety First advises switching off at the panel for any DIY near electrics. Then have a licensed electrician check and repair the cable before the rail goes up, and move the rail so no fixing lands on that line.[2]
Can I use a longer screw than the one that came with a drywall anchor?
Only with care. WallClaw says to use the screws supplied, that the lab-tested load may no longer be valid with a longer screw, and that the wrong screw tip can stop its anchor from clamping. If your rail is thicker than the supplied screw allows, look for an anchor sized for that thickness.[5]
Do I need to worry about lead paint when drilling an old wall?
Yes, if the home was built before 1978. The US EPA says such homes are more likely to have lead-based paint and that even a small amount of dust can pose health risks. Wet-mop hard surfaces and use a HEPA-filter vacuum for debris rather than dry sweeping, and in a rental the landlord must follow the RRP Rule for work that disturbs paint.[7]
Can I hang a peg rail with adhesive strips instead of screws?
Not for a rail that carries coats and bags. Adhesive hooks and strips have their own per-hook weight limits set by their maker, and a rail of coats pulls outward from the wall; screws into studs or masonry are the fixing this guide is about. For light items without drilling, see the adhesive hook guide. In detail: Adhesive hooks for renters: 8 light-duty ideas and their limits
Sources and method
How this article was made: Opened and read on 2026-10-14: fischer's DuoPower product page and its plasterboard press release, Electrical Safety First's DIY advice, the US Department of Energy page on advanced framing, chapter 3 of the 2010 ADA Standards (reach ranges), the US EPA lead page and WallClaw's anchor information sheet. No rail or fixing was tested, and no load figure is given because ratings belong to one product in one wall.
What this article adds: A to-scale diagram and worked example showing how many studs a 36 in or 48 in rail reaches at 16 and 24 in spacing, a screw-length calculation from fischer's rule, and ADA reach ranges turned into peg heights for adults and children.
Use of AI: Revised with AI assistance; every source was opened and checked on 2026-10-14; editorially reviewed before publication.
Editorially reviewed by Anna Muller on 11 October 2026 before publication.
- DuoPower universal plug , fischer. checked Supports: The plug adjusts itself to the building material by folding, expanding and knotting; listed materials include concrete, solid brick, natural stone, aerated concrete and gypsum plasterboard; required screw length = plug length + fixture thickness + 1 × screw diameter; when fixing boards the threadless part of the screw must not be longer than the fixture; suitable for wood and chipboard screws; drill diameters 5, 6, 8 and 10 mm; screw diameters 3.0–4.0 mm (5 mm plug), 4.0–5.0 mm (6 mm), 4.5–6.0 mm (8 mm), 6.0–8.0 mm (10 mm); sizes include 6 × 30 mm; the variant tables give maximum loads per wall type and minimum drill-hole depths.
- Electrical safety advice for DIY-ers , Electrical Safety First (UK). checked Supports: A common error is accidentally drilling, nailing or screwing into cables hidden inside walls; it is required that cables buried in walls are installed either horizontally or vertically from accessories such as socket-outlets or switches; a quality cable detector can help track buried cables before you start work; switch off the power at the fuseboard for DIY near electrics and, where possible, use battery-powered tools; an RCD can save your life by switching off the power quickly; if unsure about electrical risks, seek advice from a registered competent electrician.
- Framing: Building a Wall: Advanced Framing , U.S. Department of Energy, Building Science Education Solution Center. checked Supports: Wood-framed houses have traditionally been built with 2x4 studs spaced 16 inches on center, though code allows for wider spacing; advanced framing specifies 24-inch on-center studs for 2x6 wall framing rather than 16-inch on-center 2x4 framing.
- Chapter 3: Building Blocks, reach ranges (2010 ADA Standards for Accessible Design, section 308) , U.S. Access Board. checked Supports: 308.2.1 and 308.3.1: unobstructed forward and side reach, high 48 inches (1220 mm) maximum, low 15 inches (380 mm) minimum above the finish floor; Advisory 308.1 children's reach ranges: ages 3 and 4 high 36 in (915 mm), low 20 in (510 mm); ages 5 through 8 high 40 in (1015 mm), low 18 in (455 mm); ages 9 through 12 high 44 in (1120 mm), low 16 in (405 mm).
- WallClaw Anchors: performance, lab testing, screws and load definitions (manufacturer information sheet, April 2024) , WallClaw Anchors (PDF hosted by The Home Depot). checked Supports: Actual load depends on drywall age, condition and thickness, closeness to studs or edges, proper installation and flush mounting, and cantilevered items reduce load capacity substantially; do not mount any items if an anchor is loose; anchors placed too close together compromise the board and do not improve capacity, as drywall is the primary cause of failure; 5/8-inch drywall holds more than 1/2-inch, which is more common in residential construction; use the screws provided, lab-tested loads may not be valid with longer screws; maximum, ultimate and failure load are the same thing, a recommended load often has a safety factor, and makers do not all use the same one.
- Practical tips for lightweight walls (press release, March 31, 2026) , fischer group of companies. checked Supports: Plasterboard is less load-bearing than solid walls because of its thinness and porous structure; before drilling, check whether there are any electrical or water pipes behind the wall; observe the load-bearing specifications provided by the plug manufacturer; for very heavy or safety-critical fixings it is advisable to consult a professional.
- Reduce the Risk of Lead Exposure at Home , U.S. Environmental Protection Agency. checked Supports: If your home was built before 1978, it is more likely to have lead-based paint; projects that create even a small amount of dust can pose health risks; wet mop floors and hard surfaces to reduce lead dust; for debris use only HEPA vacuums and do not dry sweep; in a pre-1978 rental the landlord or property manager must comply with the RRP Rule for work that disturbs paint.