Guide · Checklist
New apartment, empty entry: a setup checklist for week one
Applies to: USRenters2010 ADA Standards 403, 404RCW 59.18.260 (Washington) The ADA widths are a yardstick, not a rule for a private apartment. Lease terms and state landlord-tenant law decide what you may fix to walls.
This page is only available in English. The language switch leads to the closest German page.
In short
In week one, an empty entry needs only a mat, one place for keys and one spot for shoes; nothing has to be fixed to a wall before day 5. On days 2 to 4, measure the narrowest clear width and the door swing and watch where things pile up. Then buy floor pieces first and wall items last, after checking the lease, and keep a 36 in (915 mm) walking path where the space allows.
At a glance
| What | Value | Basis |
|---|---|---|
| Storage depth left in a 44 in wide entry | 8 in203 mm; 44 in clear width − 36 in (915 mm) path = 8 in on one wall (example values) | calculated · [4] |
| Narrowest short pinch point the ADA yardstick allows | 32 in815 mm, for a length of 24 in (610 mm) at most, between 36 in wide stretches (2010 ADA Standards 403.5.1) | [4] |
| Clear opening of an accessible door | 32 in815 mm minimum, door open 90 degrees, face of door to stop (2010 ADA Standards 404.2.3) | [4] |
| Command hook load range | 0.5–7.5 lb0.2–3.4 kg, depending on the hook; picture hangers up to 5 lb (2.3 kg); 3M product sheet | [6] |
| Wait before adhesive hooks on fresh paint | 7 daysAt least 7 days, per 3M's Command product sheet; then wait 1 hour before loading a hook | [6] |
| Usual stud spacing behind drywall (US) | 16 or 24 in41 or 61 cm stud spacing, per Zircon's stud finder instructions; studs are 1½ in (38 mm) wide | [7] |
| Tip-over injuries treated in US emergency rooms | 17,800 per yearEstimated annual average, all ages, 2020–2022 (CPSC 2023 tip-over report) | [2] |
| Time to get out once a smoke alarm sounds | less than 2 minutesWhat residents could have in a home fire, per the US Fire Administration | [3] |
Contents
- What does a new apartment entry need on day one?
- What should you measure in a new entryway?
- How do you know where entry storage should go?
- What should you buy first for an empty entryway?
- Which entry furniture needs to be anchored to the wall?
- What should you check before drilling or using hooks in a rental?
- How do you keep the entry clear as a way out?
- Printable week-one checklist
- Common questions
- Sources and method
The first week in an empty entry splits into three short phases: three things that need no tools on day one, a few days of measuring and watching, and buying in an order that leaves wall fixings for last. Keys go missing, shoes pile up behind the door and the first coat ends up on a doorknob, but a weekend shopping trip before you know the space can easily buy the wrong depth for the wrong wall.
| Days | Job | Why then |
|---|---|---|
| Day 1 | Mat, keys, shoes | No drilling, no measuring needed |
| Days 2 to 4 | Measure and watch | Sizes and habits decide what fits |
| Days 5 to 7 | Floor pieces, then a surface | Easy to move if the spot is wrong |
| After lease and wall checks | Hooks, rails, mirrors | Holes and adhesive are hard to undo |
What does a new apartment entry need on day one?
A new apartment entry needs three things on day one, and none of them needs a drill: a mat, one place for keys and one spot for shoes.
- A mat inside the door. Moving day brings in a lot of dirt. Lay it where the door does not catch it when it opens.
- One place for keys. A bowl, a tray or a box on a surface near the door. New keys are easy to lose in a pile of packing paper.
- One spot for shoes. A tray or a strip of floor along a wall, out of the door swing.
Keep moving boxes out of the entry itself. The front door is your way out, and the US Fire Administration's escape advice is to make sure doors and windows are not blocked, because residents could have less than 2 minutes to get out once a smoke alarm sounds [3]. Flattened cartons stacked behind the door break that rule just as surely as furniture does.
What should you measure in a new entryway?
Measure four things in a new entryway before you buy anything: the clear width at the narrowest point, the swing of every door that opens into the space, where switches, outlets and radiators sit, and how much wall is left free of all of them.
- Clear width. Measure wall to wall at the tightest spot, after radiators, trim and anything already standing there.
- Door swing. Open the front door and any nearby doors fully and mark on the floor how far each one reaches.
- Switches, outlets and radiators. Note where they are and how high. A shelf in front of a switch or a cabinet over an outlet will annoy you every day.
- Free wall. What is left between door swings, switches and radiators is where hooks and shelves can go later.
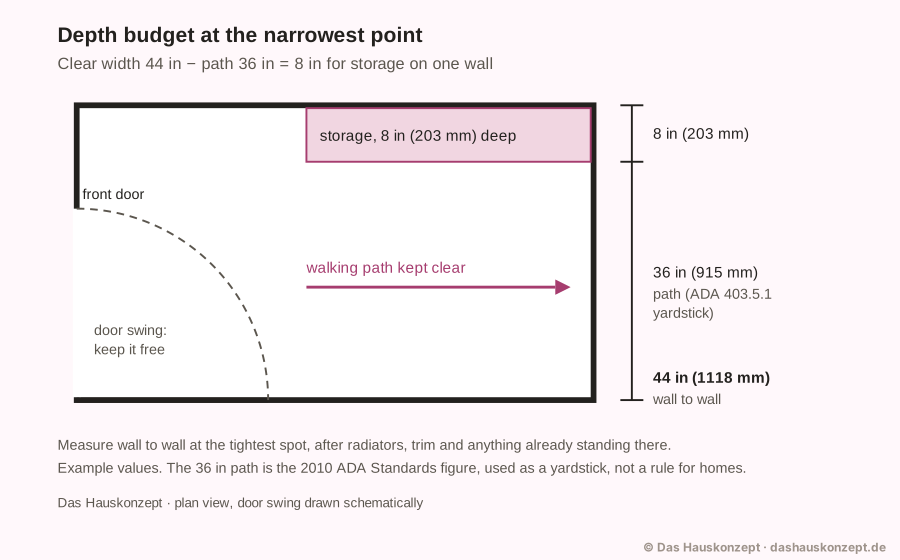
Clear width tells you how deep entry furniture can be. There is no width rule for the inside of a private apartment, but the 2010 ADA Standards give a published US yardstick: a walking surface 36 in (915 mm) wide, which may narrow to 32 in (815 mm) for no more than 24 in (610 mm) of its length [4]. Subtract the path you want to keep from the clear width and you get your depth budget.
| Narrowest clear width | Depth left for one wall with a 36 in (915 mm) path | Depth at a short spot, 32 in (815 mm) path |
|---|---|---|
| 40 in (1016 mm) | 4 in (102 mm) | 8 in (203 mm) |
| 44 in (1118 mm) | 8 in (203 mm) | 12 in (305 mm) |
| 48 in (1219 mm) | 12 in (305 mm) | 16 in (406 mm) |
| 54 in (1372 mm) | 18 in (457 mm) | 22 in (559 mm) |
Each row is clear width minus 36 in, or minus 32 in for a spot no longer than 24 in [4]. If two pieces face each other, they share the same budget. Where the front door opens, the ADA Standards keep 60 in (1525 mm) of space in front of a door on its pull side for a front approach [4]; in a home that is a reminder to keep the area the door sweeps, and the spot where you stand to open it, free of furniture.
How do you know where entry storage should go?
Entry storage should go where things already land, and the way to find that is to watch for a few days before buying. Where do bags drop? Where do coats end up? What do you reach for on the way out? Write it down as it happens.
Most of what turns up falls into four jobs: hanging coats and bags, dropping keys and post, sitting down to deal with shoes, and charging phones. That is the idea behind a drop zone, and a small entry may need only two or three of those jobs covered. If the notes show that keys always end up on the kitchen counter, the key tray may belong there rather than by the door.
What should you buy first for an empty entryway?
Buy floor pieces first for an empty entryway, then one surface, and wall items last. The order runs from easiest to move to hardest to undo.
- Floor items first. A shoe rack, a slim bench or a freestanding coat stand can move if they turn out to be in the wrong place. Check each one's depth against your depth budget.
- Then a surface. A narrow console or wall shelf for keys and post, once you know how deep it can be without blocking the path.
- Wall items last. Hooks, peg rails and mirrors, once you know your lease and what your wall is made of.
The depth budget decides the type of piece. Compare it with the depth listed for each product, and add handles and any flap, drawer or door that opens into the path. When the budget is only a few inches, wall hooks and a narrow shelf are often the only things that fit, which is one more reason to leave wall items until the lease and wall checks are done.
Which entry furniture needs to be anchored to the wall?
Any tall entry piece with drawers, doors or shelves needs anchoring to the wall, even if everything else in the entry is freestanding. CPSC's Anchor It! campaign says anchoring all furniture with drawers, doors and shelves to the wall prevents tip-over injuries and deaths [1].
The numbers behind that advice are national. CPSC estimates that US emergency departments treated an annual average of 17,800 people for tip-over injuries in 2020 to 2022; 44% of them were children under 18 and 24% were adults aged 60 and over [2]. Of the furniture-related injuries to children, about 1,000 a year involved shelving, a shelving unit or a bookcase, and children were 155 of the 217 tip-over deaths reported from 2013 to July 2023 [2]. The report lists top-heavy design, use on carpet, heavy objects on top and not using a tip-over restraint among the causes [2].
What you need, according to CPSC, is a furniture anchoring kit, a drill and bit, a screwdriver and a stud finder; after fitting, tug on the straps to check they hold [1]. That makes anchoring the one hole worth planning in week one. In a rental, ask first: CPSC's campaign notes that holes from anchors are easy to fill when you move [1], but your lease decides whether you may drill.
What should you check before drilling or using hooks in a rental?
Check four things before anything goes on a rented wall: the lease, your move-in record, what the wall is made of and what runs inside it.
- Read your lease for rules on drilling, adhesives and alterations, and ask your landlord in writing if it is unclear.
- Record the condition first. Note and photograph existing marks and holes. In Washington State, a landlord who takes a deposit must give you a signed and dated move-in checklist describing the condition of walls, flooring, furniture and appliances [5]; elsewhere, make your own and send a copy to the landlord.
- Find out what the wall is. Drywall on studs and solid masonry need different fixings. Zircon's stud finder instructions refer to standard stud spacing of 16 in (41 cm) or 24 in (61 cm), with studs 1½ in (38 mm) wide [7].
- Scan for wiring and pipes, especially above and below switches and outlets.
Do not rely on the scanner alone. Zircon's instructions warn not to assume there are no live wires in the wall, say a detector may miss wires more than 2 in (51 mm) deep, in plastic conduit or in a damp wall, and tell you to turn off the power, gas and water before drilling into or otherwise penetrating a surface [7]. If you cannot do that in your building, it is a job for the landlord's maintenance team.
Adhesive hooks avoid holes but have limits of their own. 3M's sheet for its Command range gives hooks for 0.5 to 7.5 lb (0.2 to 3.4 kg), depending on the hook, and picture hangers for up to 5 lb (2.3 kg); it says to wait at least 7 days on fresh paint, to wait one hour before loading, to use only one hook per item and not to use the strips in wet areas [6]. Check the rating on the pack against what will really hang there, coats and bags included.
How do you keep the entry clear as a way out?
Keep the entry clear as a way out by leaving the door free to open fully and the path to it unobstructed, every day and not only once the room is finished. The US Fire Administration's escape planning advice is to find two ways out of every room and make sure doors and windows are not blocked [3].
For high-rise residents, the same page adds that you should leave, close the apartment door behind you and use the stairs, not the elevator unless the fire department directs you to [3]. A door that is blocked by a shoe pile or a bench edge cannot be shut quickly behind you, which is one more reason to keep storage out of the door swing you marked on day two.
Printable week-one checklist
The printable checklist below collects every step of the week in order, from the day-one mat to the last wall check; tick it off as you go or print it before moving day.
Day 1, no tools
Days 2 to 4, measure and watch
Days 5 to 7, buy in order
Before anything goes on a wall
Common questions
Do I have to anchor furniture in a rented apartment?
Anchor any tall piece with drawers, doors or shelves, rented home or not: CPSC says anchoring that furniture to the wall prevents tip-over injuries and deaths, and its Anchor It! campaign says the holes are easy to fill when you move. Ask your landlord first if your lease restricts drilling, and keep the request and answer in writing.[1]
What should a move-in condition checklist include?
A move-in checklist should describe the condition, cleanliness and any existing damage of walls, paint, wallpaper, carpets and other flooring, furniture and appliances. That is the list in Washington State law (RCW 59.18.260), where a landlord who takes a deposit must give the tenant such a signed and dated checklist. Other states differ, but the same list makes a good record anywhere.[5]
Will adhesive hooks stick to wallpaper?
No: 3M's Command product sheet says not to use the strips with wallpaper. It adds that they may not adhere well to vinyl surfaces and that they will not stick to dirty, dusty or oily surfaces. On wallpaper, a freestanding coat stand or a rail fixed with the landlord's permission is the safer choice.[6]
How do I remove adhesive hooks without peeling paint?
Stretch the strip, do not pull it off. 3M says to slide the hook off its back plate, hold the back plate gently against the wall, grab the tab and slowly stretch it straight down along the wall at least 12 in (30 cm) until it releases, and never to pull the strip towards you.[6]
Sources and method
How this article was made: Opened and read on 2026-10-14: CPSC's Anchor It! site and its 2023 annual tip-over report, the US Fire Administration's home fire escape planning page, chapter 4 of the 2010 ADA Standards (sections 403 and 404), Washington's RCW 59.18.260, 3M's Command product information sheet and Zircon's e50 stud finder instructions. The depth budget is our arithmetic on the ADA widths. No product was tested and no apartment was measured; the 44 in entry is an example.
What this article adds: A week-one order of jobs for an empty entry with a depth budget: clear width minus a 36 in path, worked for a 44 in entry and drawn as a dimensioned plan, plus the lease, wall and anchoring checks before anything is fixed.
Use of AI: Revised with AI assistance; every source was opened and checked on 2026-10-14; editorially reviewed before publication.
Editorially reviewed by Anna Muller on 11 October 2026 before publication.
- Anchor It! , US Consumer Product Safety Commission (CPSC). checked Supports: 'Anchoring all furniture with drawers, doors, and shelves to the wall prevents tip-over injuries and deaths'; tools listed: furniture/TV anchoring kit, drill and drill bit, screwdriver, stud finder; tug on the straps to check; 'Moving? Renting? Redecorating? Covering holes from your anchors won't be a problem.'
- Product Instability or Tip-Over Injuries and Fatalities Associated with Televisions, Furniture, and Appliances: 2023 Report (February 2024) , US Consumer Product Safety Commission (CPSC). checked Supports: Estimated annual average of 17,800 emergency department-treated tip-over injuries, 2020–2022; 7,800 (44%) to children under 18 and 4,200 (24%) to seniors 60 and older; of 6,400 furniture-related child injuries, 1,000 (16%) involved shelving, a shelving unit or a bookcase; 217 reported fatalities January 2013 to July 2023, 155 (71%) children under 18; contributing factors include top-heavy design, use on carpet, non-use of a tip-over restraint and heavy objects on top.
- Home fire escape plans , US Fire Administration (FEMA). checked Supports: 'Find 2 ways out of every room'; 'Make sure doors and windows are not blocked'; residents 'could have less than 2 minutes to escape a home fire once the smoke alarm sounds'; high-rise residents: leave your apartment, close the door behind you, use the stairs; do not use the elevator unless directed by the fire department.
- Chapter 4: Accessible Routes (2010 ADA Standards for Accessible Design, sections 403 and 404) , US Access Board. checked Supports: 403.5.1: clear width of walking surfaces 36 inches (915 mm) minimum, reducible to 32 inches (815 mm) for a length of 24 inches (610 mm) maximum, with reduced segments separated by segments 48 in (1220 mm) long and 36 in wide; 404.2.3: door openings 32 inches (815 mm) clear minimum, measured with the door open 90 degrees between the face of the door and the stop; Table 404.2.4.1: 60 in (1525 mm) maneuvering clearance on the pull side, front approach.
- RCW 59.18.260, Moneys paid as deposit or security for performance by tenant — Written rental agreement to specify terms and conditions for retention by landlord — Written checklist required , Washington State Legislature. checked Supports: No deposit may be collected unless the rental agreement is in writing and a written checklist or statement is provided at the commencement of the tenancy describing the condition and cleanliness of or existing damages to the premises, including walls (wall paint and wallpaper), carpets and other flooring, furniture and appliances; the checklist is signed and dated by landlord and tenant and the tenant gets a copy.
- Command Adhesive Products, product information sheet (March 2011) , 3M Construction and Home Improvement Markets Division. checked Supports: Hooks hold items from 0.5 to 7.5 lbs; hangers hold pictures up to 5 lbs; wait one hour before hanging items; remove by slowly stretching the tab straight down along the wall at least 12 inches, never towards you; do not use with wallpaper; may not adhere well to vinyl; will not adhere to dirty, dusty or oily surfaces; wait at least 7 days on freshly painted surfaces; not recommended on bare wood or porous unpainted surfaces; not for wet environments; use only one hook per item.
- StudSensor e50 instructions , Zircon Corporation. checked Supports: 'Do not assume there are no live electrical wires in the wall'; 'always turn off the electrical power, gas, and water supplies before penetrating a surface'; electrical field locators may not detect live AC wires if moisture is present, if wires are more than 2 in. (51 mm) from the surface, in plastic conduit or behind plywood or metallic wall covering; do not rely exclusively on the detector; standard 16 in. (41 cm) and 24 in. (61 cm) stud spacing; studs are 1 1/2 in. (38 mm) wide.